We continue our investigation concerning the generation of group elements of the Plane Groups.
The Plane Group P6mm (Sequel)
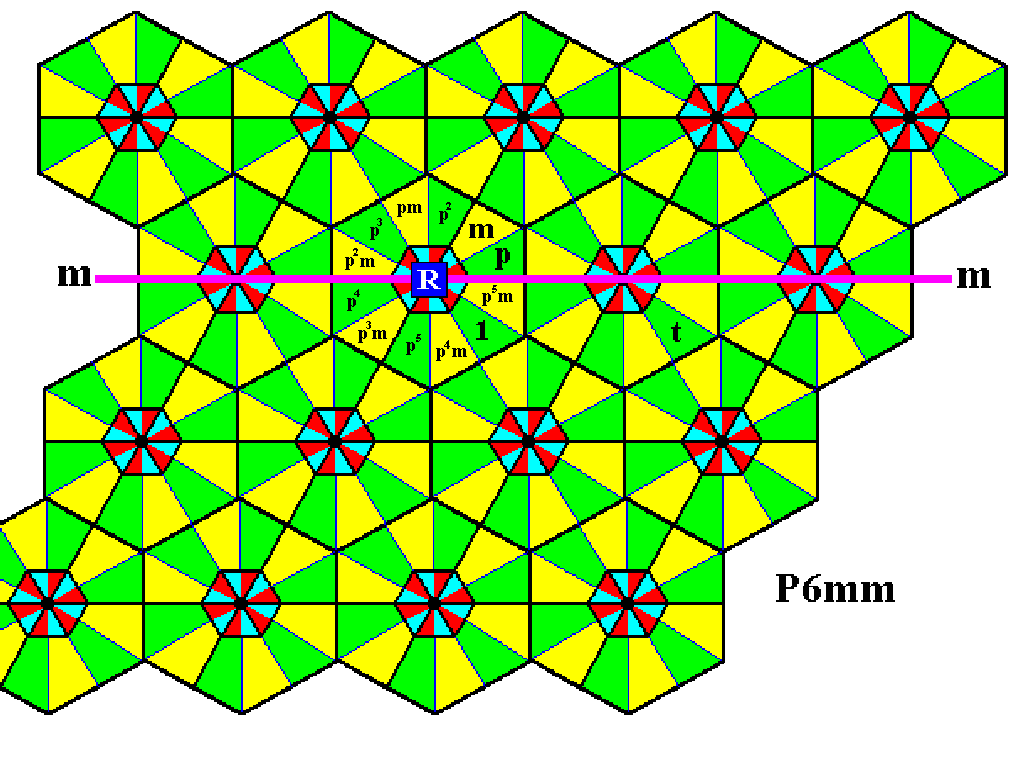
The next Figure shows the generation of all the remaining group elements of the composed motif s.l. at the lattice point R .
Figure 1. Generation of the remaining group elements represented by the basic units of the motif s.l. at the lattice point R .
The second row of motifs s.l. of the P6mm pattern can now be completed by means of translations :
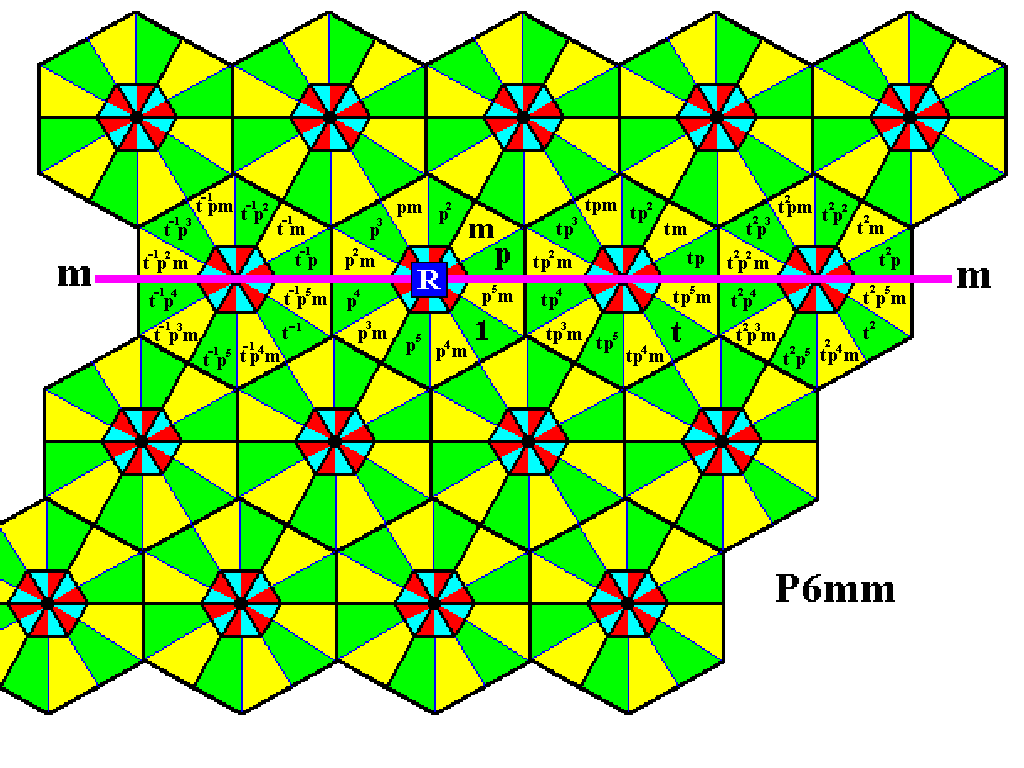
Figure 2. Completion of the filling-in of group elements of the second row of motifs s.l. of the P6mm pattern.
The next Figure indicates how the first and third rows of the motifs s.l. of our P6mm pattern can be reached by rotations.
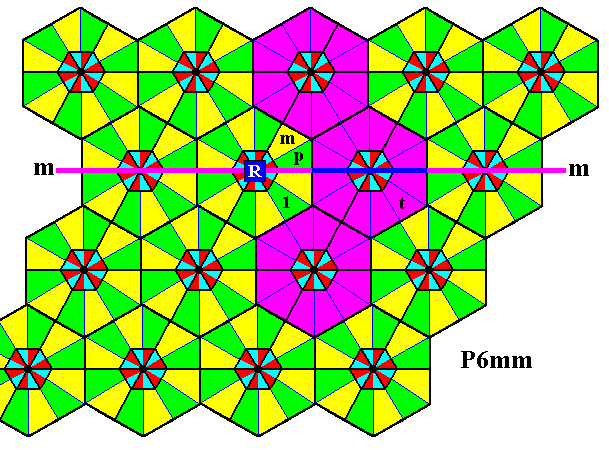
Figure 3. The first and third rows of motifs s.l. can be reached by rotations about the point R of the elements making up the composed motif s.l. at the lattice point right next to the lattice point R :
To reach the first row, we use an anticlockwise rotation of 600 about the point R , represented by the transformation p .
To reach the third row, we can use an anticlockwise rotation of 3000 about the point R , represented by the transformation p5 .
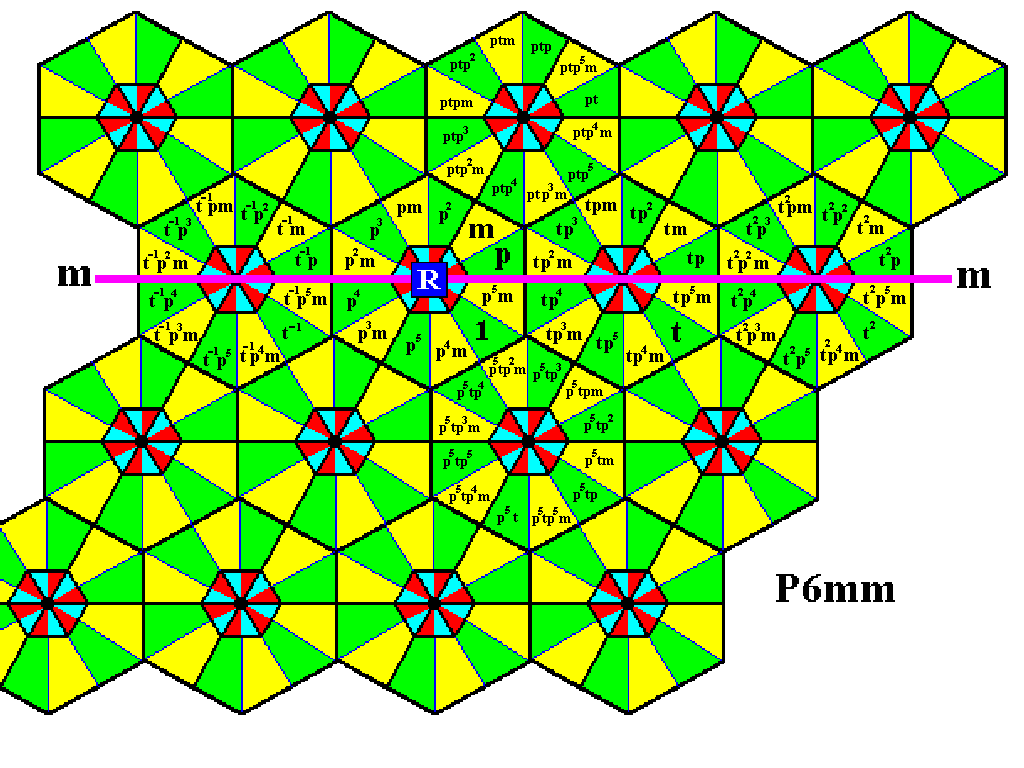
Figure 4. The first and third rows have been reached, and the involved group elements generated.
The fourth row can also be reached by a rotation of already generated elements, namely by rotating the elements that make up the last composed motif s.l. of the second row. When we rotate these elements anticlockwise by 3000 about the point R , then we will reach the fourth row. The next Figure indicates this rotation.
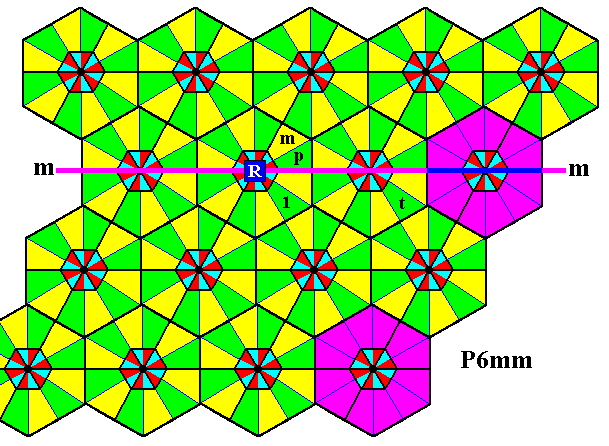
Figure 5. Indication how to reach the fourth row by applying the transformation p5 to the elements of the last motif s.l. of the second row.
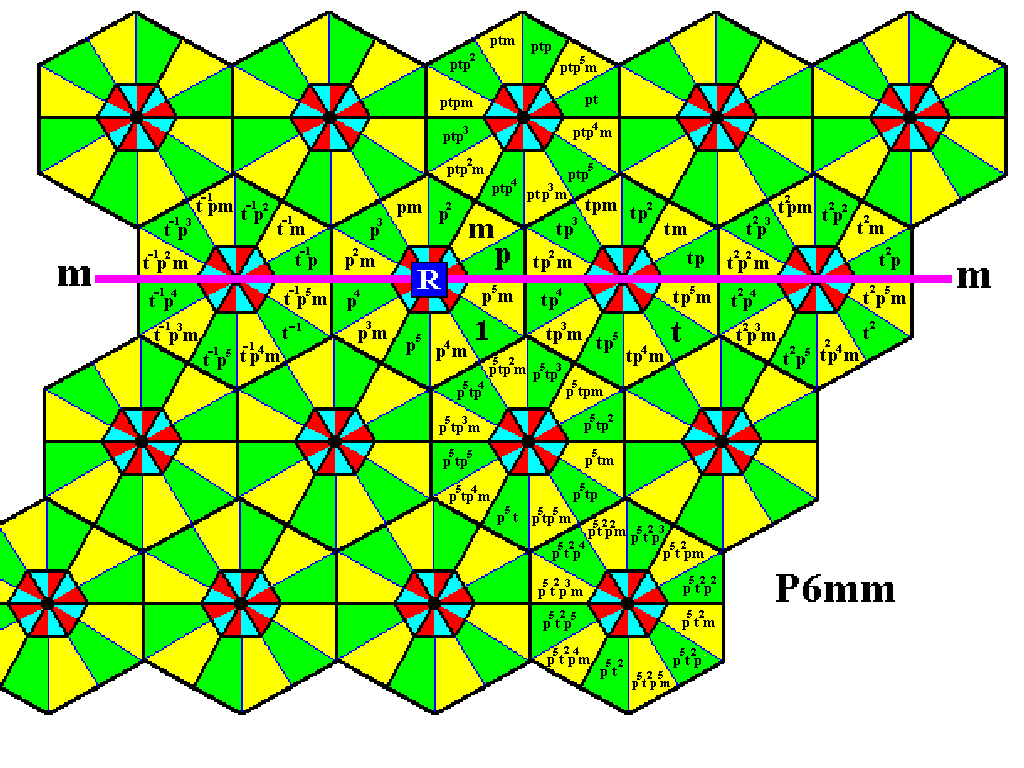
Figure 6. The fourth row has been reached, and the involved group elements are generated.
The first, third, and fourth rows can now be completed by means of translations.
A, B, C, D, E, F, R, G, H, I, J, K, L, M, N, O, P.
Each such lattice node is associated with twelve triangular areas representing group elements. These areas are numbered
1, 2, 3, 4, 5, 6, 7, 8, 9, 10, 11, 12,
for every lattice node.
We now explain how to read the labels of these areas.
The twelve areas associated with the lattice node A must be read as
A1, A2, A3, A4, A5, A6, A7, A8, A9, A10, A11, A12.
The twelve areas associated with the lattice node B must be read as
B1, B2, B3, B4, B5, B6, B7, B8, B9, B10, B11, B12.
And so on.
An exception to this procedure is represented by the fact that we label the generators p, m and t with their proper symbols, p, m and t . Also the initial element will be adressed by its proper symbol 1 (instead of R1). So the twelve areas associated with the lattice point R are given as
1 (initial element, identity element), R2, p, m, R5, R6, R7, R8, R9, R10, R11, R12.
The areas associated with the lattice point G are then given by
t, G2, G3, G4, G5, G6, G7, G8, G9, G10, G11, G12..
The next Figure illustrates this labeling, and is followed by a table that connects the labels with the corresponding generative symbols for the group elements.
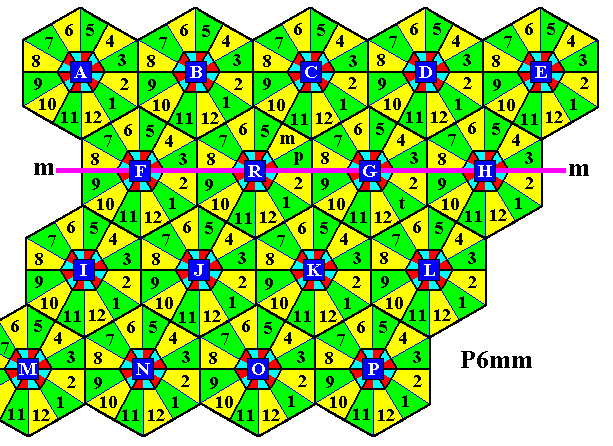
Figure 7. Labeling of the areas of the P6mm pattern, representing group elements. The tabel below relates these labels with the true group element symbols. The initial element and the generator elements have as their label directly their true group element symbol.
In the next Table we give all group elements (and their corresponding labels) of the displayed part of our P6mm pattern, thus including the ones that have already been determined above. These latter will be displayed with white symbols, while the newly generated group elements -- obtained by completing the first, third and fourth rows by applying translations -- will be given in red.
| Label | Group element | Label | Group element | Label | Group element | ||
| A1 | t-2ptp5 | A2 | t-2ptp4m | A3 | t-2pt | ||
| A4 | t-2ptp5m | A5 | t-2ptp | A6 | t-2ptm | ||
| A7 | t-2ptp2 | A8 | t-2ptpm | A9 | t-2ptp3 | ||
| A10 | t-2ptp2m | A11 | t-2ptp4 | A12 | t-2ptp3m | ||
| B1 | t-1ptp5 | B2 | t-1ptp4m | B3 | t-1pt | ||
| B4 | t-1ptp5m | B5 | t-1ptp | B6 | t-1ptm | ||
| B7 | t-1ptp2 | B8 | t-1ptpm | B9 | t-1ptp3 | ||
| B10 | t-1ptp2m | B11 | t-1ptp4 | B12 | t-1ptp3m | ||
| C1 | ptp5 | C2 | ptp4m | C3 | pt | ||
| C4 | ptp5m | C5 | ptp | C6 | ptm | ||
| C7 | ptp2 | C8 | ptpm | C9 | ptp3 | ||
| C10 | ptp2m | C11 | ptp4 | C12 | ptp3m | ||
| D1 | tptp5 | D2 | tptp4m | D3 | tpt | ||
| D4 | tptp5m | D5 | tptp | D6 | tptm | ||
| D7 | tptp2 | D8 | tptpm | D9 | tptp3 | ||
| D10 | tptp2m | D11 | tptp4 | D12 | tptp3m | ||
| E1 | t2ptp5 | E2 | t2ptp4m | E3 | t2pt | ||
| E4 | t2ptp5m | E5 | t2ptp | E6 | t2ptm | ||
| E7 | t2ptp2 | E8 | t2ptpm | E9 | t2ptp3 | ||
| E10 | t2ptp2m | E11 | t2ptp4 | E12 | t2ptp3m | ||
| F1 | t-1 | F2 | t-1p5m | F3 | t-1p | ||
| F4 | t-1m | F5 | t-1p2 | F6 | t-1pm | ||
| F7 | t-1p3 | F8 | t-1p2m | F9 | t-1p4 | ||
| F10 | t-1p3m | F11 | t-1p5 | F12 | t-1p4m | ||
| 1 | 1 | R2 | p5m | p | p | ||
| m | m | R5 | p2 | R6 | pm | ||
| R7 | p3 | R8 | p2m | R9 | p4 | ||
| R10 | p3m | R11 | p5 | R12 | p4m | ||
| G1 | t | G2 | tp5m | G3 | tp | ||
| G4 | tm | G5 | tp2 | G6 | tpm | ||
| G7 | tp3 | G8 | tp2m | G9 | tp4 | ||
| G10 | tp3m | G11 | tp5 | G12 | tp4m | ||
| H1 | t2 | H2 | t2p5m | H3 | t2p | ||
| H4 | t2m | H5 | t2p2 | H6 | t2pm | ||
| H7 | t2p3 | H8 | t2p2m | H9 | t2p4 | ||
| H10 | t2p3m | H11 | t2p5 | H12 | t2p4m | ||
| I 1 | t-2p5tp | I 2 | t-2p5tm | I 3 | t-2p5tp2 | ||
| I 4 | t-2p5tpm | I 5 | t-2p5tp3 | I 6 | t-2p5tp2m | ||
| I 7 | t-2p5tp4 | I 8 | t-2p5tp3m | I 9 | t-2p5tp5 | ||
| I 10 | t-2p5tp4m | I 11 | t-2p5t | I 12 | t-2p5tp5m | ||
| J1 | t-1p5tp | J2 | t-1p5tm | J3 | t-1p5tp2 | ||
| J4 | t-1p5tpm | J5 | t-1p5tp3 | J6 | t-1p5tp2m | ||
| J7 | t-1p5tp4 | J8 | t-1p5tp3m | J9 | t-1p5tp5 | ||
| J10 | t-1p5tp4m | J11 | t-1p5t | J12 | t-1p5tp5m | ||
| K1 | p5tp | K2 | p5tm | K3 | p5tp2 | ||
| K4 | p5tpm | K5 | p5tp3 | K6 | p5tp2m | ||
| K7 | p5tp4 | K8 | p5tp3m | K9 | p5tp5 | ||
| K10 | p5tp4m | K11 | p5t | K12 | p5tp5m | ||
| L1 | tp5tp | L2 | tp5tm | L3 | tp5tp2 | ||
| L4 | tp5tpm | L5 | tp5tp3 | L6 | tp5tp2m | ||
| L7 | tp5tp4 | L8 | tp5tp3m | L9 | tp5tp5 | ||
| L10 | tp5tp4m | L11 | tp5t | L12 | tp5tp5m | ||
| M1 | t-3p5t2p | M2 | t-3p5t2m | M3 | t-3p5t2p2 | ||
| M4 | t-3p5t2pm | M5 | t-3p5t2p3 | M6 | t-3p5t2p2m | ||
| M7 | t-3p5t2p4 | M8 | t-3p5t2p3m | M9 | t-3p5t2p5 | ||
| M10 | t-3p5t2p4m | M11 | t-3p5t2 | M12 | t-3p5t2p5m | ||
| N1 | t-2p5t2p | N2 | t-2p5t2m | N3 | t-2p5t2p2 | ||
| N4 | t-2p5t2pm | N5 | t-2p5t2p3 | N6 | t-2p5t2p2m | ||
| N7 | t-2p5t2p4 | N8 | t-2p5t2p3m | N9 | t-2p5t2p5 | ||
| N10 | t-2p5t2p4m | N11 | t-2p5t2 | N12 | t-2p5t2p5m | ||
| O1 | t-1p5t2p | O2 | t-1p5t2m | O3 | t-1p5t2p2 | ||
| O4 | t-1p5t2pm | O5 | t-1p5t2p3 | O6 | t-1p5t2p2m | ||
| O7 | t-1p5t2p4 | O8 | t-1p5t2p3m | O9 | t-1p5t2p5 | ||
| O10 | t-1p5t2p4m | O11 | t-1p5t2 | O12 | t-1p5t2p5m | ||
| P1 | p5t2p | P2 | p5t2m | P3 | p5t2p2 | ||
| P4 | p5t2pm | P5 | p5t2p3 | P6 | p5t2p2m | ||
| P7 | p5t2p4 | P8 | p5t2p3m | P9 | p5t2p5 | ||
| P10 | p5t2p4m | P11 | p5t2 | P12 | p5t2p5m |
So we have now generated all group elements of the displayed part of the P6mm pattern.
In the next -- and last -- document devoted to the 'noetic crystallization process' of two-dimensional crystals, we will summarize these 17 basic patterns as they are exhaustively partitioned in areas that represent group elements.
e-mail : 
To continue click HERE for further study of the totally dynamic and holistic nature of Reality.
back to homepage
back to the Ink-in-Glycerine Model
back to Part I of The Crystallization process and the Implicate Order
back to Part II of The Crystallization process and the Implicate Order
back to Part III of The Crystallization process and the Implicate Order
back to Part IV of The Crystallization process and the Implicate Order
back to Part V of The Crystallization process and the Implicate Order
back to Part VI of The Crystallization process and the Implicate Order
back to Part VII of The Crystallization process and the Implicate Order
back to Part VIII of The Crystallization process and the Implicate Order
back to Part IX of The Crystallization process and the Implicate Order
back to Part X of The Crystallization process and the Implicate Order
back to Part XI of The Crystallization process and the Implicate Order
back to Part XII of The Crystallization process and the Implicate Order
back to Part XIII of The Crystallization process and the Implicate Order
back to Part XIV of The Crystallization process and the Implicate Order
back to Part XV of The Crystallization process and the Implicate Order
back to Part XVI of The Crystallization process and the Implicate Order
back to Part XVII of The Crystallization process and the Implicate Order